NeXTdimension demos
What are the NeXTdimensionTM demos, you ask? Great tools for capturing and manipulating color graphics and video! We encourage you to get acquainted with them.
Some of the demos found in /NextDeveloper/Demos highlight the video and imaging capabilities of the NeXTdimension system, such as live video in, video out, and 32-bit accelerated graphics. These demos are installed with the NeXTdimension Updates package.

CompressionLab
This application allows you to open up any TIFF image, compress it by using one of three techniques-JPEG, LZW, and PackBits-and save the resulting compressed file. The ScrollView on the left displays the TIFF image. The ScrollView on the right displays the image after compression and expansion. The Result box displays some statistics on the compression. This demo works on all NeXT systems.

NeXTtv
NeXTtvTM is like having a TV monitor in your computer. It allows you to display images from a video source in a video-like window and to control the hue, saturation, brightness, sharpness, and gamma. It also captures video images and allows for still video output control. This demo requires a NeXTdimension system.

ScreenScape
ScreenScapeTM transparently sends a partial view of your NeXTdimension screen to the NeXTdimension video output ports. This view automatically tracks the mouse as you work. At any time, you can freeze a frame so that it no longer follows the mouse. This demo requires a NeXTdimension.

VideoApp
Planning to write a video application? Complete with source (in /NextDeveloper/ Examples/VideoApp), the VideoApp program lets you exercise the video Application Programming Interface (API) of the NXLiveVideoView. It also includes image grab and video output of graphics. This demo requires a NeXTdimension.
what video inputs and outputs are available?
Two composite video inputs, which use an RCA connector, and one Svideo input, which uses a Din-5 connector, are available on the NeXTdimension board. There is one composite video output, one Svideo output, and one analog RGB video output, which uses a D-9 connector (see figure 1).
figure 1: video connectors
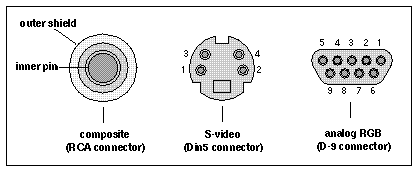
RCA composite is a one-channel signal that combines information about chrominance, luminance, picture, and synch. This is the most common connector found on consumer-level video equipment. Svideo (also known as Y/C) produces a higher-quality picture than RCA composite because it splits up the chrominance and luminance information into two separate signals. Finally, analog RGB, generally found only in professional video equipment, splits up the signal into red, green, and blue channels. RGB provides the highest-quality video signal.
how can I show a video on the NeXTdimension?
You can use either NeXTtv or VideoApp to show a video on your NeXTdimension display. First, connect a video source (such as a VTR, VCR, laser disc player, or camcorder) to one of the inputs on the NeXTdimension board.
In NeXTtv, select the appropriate video input on the NeXTtv monitor. You'll find three selections for input (Ln1, Ln2, Ln3) and one for output (Out1). Ln1 is the first RCA composite input, Ln2 is the second RCA composite input, and Ln3 is the S-video input. Out1 is output-either the RCA composite output, S-video output, or RGB output. Press the Power button to start your video source and turn on the display.
To show a video in VideoApp, select the appropriate input in the source section of the VideoView Inspector panel. SRC1 and SRC2 are the two RCA composite video inputs, and SVHS is the S-Video input. Start your video source and turn on VideoView by clicking the Start button on the VideoView Inspector panel.
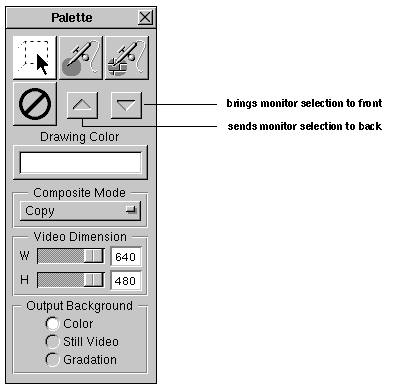
what are the up and down arrows on the Palette panel for?
You can use the up and down arrows on the Palette panel in NeXTtv to bring a selection on the monitor to the front or send a selection to the back (see figure 2). This applies to a live video grab selection or a TIFF file that has been dragged or dropped into a NeXTtv window. You may have to click the arrows more than once.
figure 2: Palette panel
can I overlay characters or an image on the video?
You can overlay any image on the video on the NeXTtv monitor, but you can't send it to video out.
how can I control my video device from the NeXTdimension?
Not a lot of consumer electronics equipment, whether it costs two hundred dollars or two thousand, has direct serial control connections or the intelligence to use a serial control protocol. In most cases, in order to advance or rewind to a particular frame, you'll need a device capable of converting a signal from serial to the proprietary control language of the video source you're using. These are some of the available conversion devices:
 |
Pioneer has a PCM (pulse code modulation) input that accepts their proprietary |
|
SR-Remote protocol. This feature was originally developed to connect various Pioneer |
|
components and control them from one remote control. |
|
|
Sony Corporation has done the same thing by adding a port called Control-S, |
|
Control-L/LANC. This type of control is found on many types of Sony machines. |
The SIAIII box from Visual Data Systems converts a signal from serial into PioneerTM SR-Remote or Sony® Control-S. This control is asynchronous.
Such a conversion device is the only additional hardware you'll need. You still have to write the application to control the video source, however.
Note: A few devices do allow direct serial communication. Two laser disc players, the Pioneer LDB-4200 and the Sony MDP-1100 are lower in cost. (They cost approximately $800 and $1,500.) The Vbox is another example. It is Sony's new video/computer interface CL-1000. It can accept serial input (ViSCA-a protocol invented by Sony) and translate it into a Control-S or Control-L/LANC protocol (nonserial) for controlling such devices as Handycams®, Video-8, Hi8 VCRs, and even Sony laser disc players. Future consumer video devices from Sony will have ViSCA ports built in.
can I save a single frame on the NeXTdimension?
You can save an entire frame of video using NeXTtv or VideoApp. With NeXTtv, you can also save a selected portion of a frame.
To save a single frame of video using VideoApp, follow these steps:
1. Start a video from the VideoView Inspector panel.
2. Choose Select All.
3. Click the Stop button to freeze the video.
4. Click the Grab button. This will bring up the Save panel.
5. Name the file and click OK.
Now you've saved a single frame of video as a TIFF file.
To save an entire frame using NeXTtv, follow these instructions:
1. Start a video on the display.
2. Click the camera to pause the video on the display.
3. Choose Copy from the Edit menu.
4. Start up Icon (located in /NeXTDeveloper/Demos).
5. Choose New from the Image menu in Icon.
6. Choose Paste from the Edit menu in Icon.
7. Choose Save As from the Image menu in Icon.
8. Name the image and click OK.
To save a portion of a frame using NeXTtv, complete the following instructions:
1. Start a video on the monitor.
2. Click the camera to pause the video on the monitor.
3. Choose Palette from the Tools menu in NeXTtv.
4. Click the button with the square and the arrow in the Palette panel.
5. Select a rectangular area on the screen by dragging the arrow over the desired area and releasing the mouse button.
Now follow steps 3 through 8 in the previous procedure.
can I set a still video as the background in NeXTtv or VideoApp?
Yes, both NeXTtv and VideoApp have this capability.
To set a still video as the background using NeXTtv, follow these steps:
1. Start up NeXTtv.
2. Select Out1 on the monitor.
3. Click the Power button on the monitor.
4. Choose Tools from the NeXTtv menu.
5. Click Palette to bring up the Palette panel.
6. Select Still Video in the Output Background section of the Palette panel.
7. Select an image in the File Viewer.
8. Drag the icon of that image into the NeXTtv monitor screen.
To set a still video as the background using VideoApp, follow these steps:
1. Start up VideoApp.
2. Click Output in the VideoView Inspector panel.
3. Click the Open Image button in the VideoView Inspector panel. An Open panel will appear.
4. Select the image that you want for the background and click OK.
5. If you want the image to fill up the entire VideoView Inspector panel, choose Scale to Fit. (This feature is not available in NeXTtv.)
can I set the background color or gradation in NeXTtv or VideoApp?
You can set the background color and gradation only in NeXTtv. To do so, complete the following steps:
1. Start up NeXTtv.
2. Select Out1 on the monitor.
3. Click the Power button.
4. Choose Tools from the NeXTtv menu.
5. Click Palette to bring up the Palette panel.
6. Double-click the border of the Drawing Color box to bring up the Colors panel.
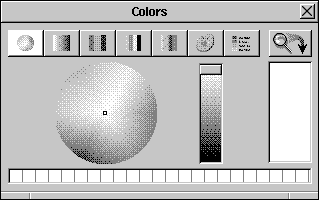
7. Select Color in the Output Background section of the Palette panel.
8. Select a color in the Colors panel and drag a swatch of the color you want into the Drawing Color box in the Palette panel.
9. If the color doesn't appear on your screen, click Ln1, Ln2, or Ln3 and then click Out1.
To set the background gradation, complete steps 1 through 6 for setting a background color and then continue as follows:
1. Choose Tools from the NeXTtv menu.
2. Click Gradations to bring up the Gradations box.
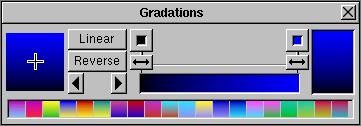
3. Drag a swatch of the color you want from the Colors panel into either of the two small squares on the Gradations panel.
4. Drag another color from the Colors panel into the other small square.
5. The gradation will appear in the well on the right side of the Gradations panel. To save this for future use, drag the gradation into one of the squares at the bottom of the panel.
6. To change the gradation from Linear to Radial, click the Linear button.
7. To reverse the gradation, click Reverse.
8. To change the orientation of the gradation, drag the plus symbol in the square on the right of the panel to the desired location.
9. The gradation level is set to 100 by default. To increase the gradation level, click the right-arrow button (below the Reverse button) in the Gradations panel. To decrease the gradation level, click the left-arrow button
definitions of terms
Chrominance: The color portion of the video signal that includes hue and saturation information. Low chroma means the color picture looks pale or washed out. High chroma means the color is too intense and tends to bleed into surrounding areas.
JPEG (Joint Photography Experts Group): One of the two committees developing video compression methods. JPEG's objective has been to create a common CCITT/ISO standard for continuous-tone image compression for both color and grayscale images. JPEG works on a symmetrical compression scheme horizontally and vertically along the picture. There is no temporal compression; each frame is systematically compressed as an individual unit.
JPEG compresses and decompresses with some information loss but can achieve compression ratios anywhere from 10:1 to 100:1. The ratio is determined by a user-settable factor ranging from 1 to 255, with higher factors yielding greater compression. More information is lost with greater compression. Generally, 15:1 compression is safe for publication-quality images.
Luminance: The degree of lightness or darkness in colors created by mixing lights. The equivalent of value in colors created by mixing pigments.
LZW (Lempel-Ziv-Welch) or LZ (Lempel-Ziv): A redundancy-based compression scheme. Instead of coding each symbol, it replaces frequently used symbol strings with fixed-length codes. LZW compresses and decompresses without information loss and achieves compression ratios of anywhere from 2:1 to 3:1.
PackBits: Compresses and decompresses without information loss but may not achieve the same compression ratios as LZW.
Picture: A color image file (2, 8, 12, or 24-bit).
Synch: Signal synchronization.