
| support bulletin | volume 3, issue 1 | winter 1993 |
when one server isn't enough
by Dave Cottle
Sometimes one isn't enough. Take mail servers, for example. If your NetInfo network is very large, with a great number of users and a huge volume of mail, you may find that using your root NetInfo server as the mail server just doesn't fit the bill. With a little careful planning and some elbow grease, you can restructure your network to include additional mail servers.
do I or don't I?
Setting up multiple mail servers isn't a trivial task, so first decide if youreally need them. Using multiple servers is all about performance. On an existing network, if you're experiencing SMTP (Simple Mail Transfer Protocol) timeouts or just general sluggishness with services provided by your mail server, consider additional mail servers. If yournetwork is or will be spread over several locations, it's a good idea to have one mail server per location, especially if the different sections of the network are connected using a medium slower than 256 kilobits per second.
a plan for all servers
Planning, of course, is always the place to begin. Here's a list of requirements for using multiple mail servers:
|
A NetInfo domain hierarchy with at least three levels. If your network is large enough or complicated |
| enough to need multiple mail servers, no doubt you already have at least a three-level domain hierarchy. | |
|
Each mail server identified to its clients as the host alias mailhost. Mail servers are assumed to be |
| named mailhost in the default sendmail configuration files. | |
|
All mail spool directories accessible throughout the network. This allows users to access mail from any |
| computer on the network. | |
|
User names aliased to name@mailserver. With multiple mail servers, mail must be sent to a user at a |
| specific mail server. | |
|
NeXTmail preferences set to identify the appropriate mail spool directory. Mail might not be stored in |
| /usr/spool/mail. |
With these requirements in mind, you can now ask yourself some questions. The answers will guide your work as you set up the additional servers. You'll probably find it useful to make a chart of the decisions you make. A carefully written and organized plan will make it much less likely that you'll spend an entire night tracking down errors.
how many servers will you have?
No magic formula can give you the answer to this question, but here are some things to consider. If mail traffic on your network is heavy enough to require multiple mail servers, you might want to dedicate computers to this service. How many can you allocate? Mail can take up quite a bit of disk space (perhaps 200 MB), so mail servers should have plenty. Will you need to buy additional hard disks?
Another thing to consider is physical location. If your network is spread over several campuses, you might want to have a mail server for each location. Once you've identified the computers you'll be using, make a note of their host names.
which computer will store /LocalLibrary/Images/People?
Mail pictures and aliases are stored separately from the mail itself. Unlike with mail spool directories, you have no flexibility in the location of pictures and aliases-you must store them in
/LocalLibrary/Images/People. Where will you put the directory? You might use one of the mail servers or another computer entirely. Another option is to have each mail server export its own People directory, with one designated the master. You can then copy the files from the master directory to the other servers periodically (each night, probably) using cron and rdist, for example.
which midlevel domains will each server cover?
If your servers have fairly equivalent horsepower and disk space, you might try for a fairly even distribution of the load. Do some domains serve considerably more clients than others? Mail traffic may not be evenly distributed among domains. Keep the location in mind when making this decision as well. Make a list of the domain assignments for each mail server.
will the mail servers have their own domain?
You're going to end up with a lot of mail aliases, so you might want to set up a special domain for the mail servers to hold the mail aliases. Because alias resolution is done by the mail servers, they're the only computers that need access to alias information. If you store the aliases in the root domain, it's just that much more traffic the root server (and clones) will have to handle. If you decide to go this route, keep in mind that the mail servers probably won't be able to provide other kinds of service, such as NFS, file service.
which users will be served by each mail server?
You've already decided which midlevel domain will be served by each mail server. Now you need to decide which users will be served by each server. Just figure out which computer each user reads mail from most frequently. The mail server assigned to the midlevel NetInfo domain of this computer will also serve that user. It's important to write down this information because you're going to need a mail alias for every user on your network.
set 'em up, Joe
Equipped with your written plan, you can jump in and start construction. You can take most of the steps in advance, but at some point you'll be interrupting mail service briefly. Plan the event to occur when the fewest users will be disturbed, such as at night or on a weekend, and give users plenty of warning before the inconvenience. The whole event can take several hours, depending on how many users, domains, and servers you have.
Here's a quick look at what you'll be doing:
1. Create a file containing all the mail aliases.
2. Set up the new midlevel domain for the mail servers, if you've decided to use one.
3. Modify the NetInfo databases to identify the new mail servers.
4. Export and import the mail spool directories.
5. Load the mail aliases into NetInfo.
preparing mail aliases
With multiple mail servers, mail addressed to a user must be sent to the specific mail server for that user. For example, mail might need to be addressed to tina@venus. Rather than asking your users to memorize everybody's mail server, set up mail aliases so that mail addressed to a user will be directed appropriately.
Create a plain text file containing all the mail aliases. Type carefully, and double-check your work. Remember, you need an alias for each and every user. Each line in your file will look like the following, with mailserver replaced by the host name of the mail server for user:
 user: user@mailserver
Later, you'll use niload to load the aliases into the appropriate domain. Because you're just entering aliases into a file at this point, you won't interfere with mail delivery and can do this in advance.
creating the mail server domain
This step won't interfere with mail delivery either, so consider doing it in advance as well. If you've decided to collect your mail servers into a separate domain, now's the time to set it up. Follow the instructions in NeXTSTEP Network and System Administration to use NetInfoManager to create the new midlevel domain. Choose one of the mail servers to be the master server for the new domain, and make each of the other mail servers a clone (and therefore a client) of the new domain.
When you've finished, the new midlevel domain will have a host entry for each of the mail servers. If a host entry exists for any of the mail servers in some other midlevel domain, be sure to remove the serves property from the entry in the other domain. If you don't, there will be conflicts when the mail servers attempt to bind to their parent.
identifying the servers
Mail on a network is sent to the computer identified as mailhost, assuming you use the default sendmail configuration files. Your next step is to make sure that each client computer recognizes the correct computer as the mail server and that everybody's using the right sendmail configuration file. This is the first step that will interrupt current mail service.
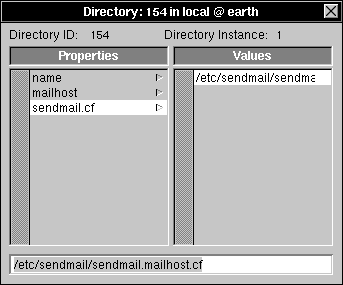
Use NetInfoManager to modify the local domain on each mail server to use /etc/sendmail/sendmail.mailhost.cf. Create a new NetInfo directory under /locations called sendmail. Add two properties to the new directory: mailhost, with the host name of the server as its value, and sendmail.cf, with the value /etc/sendmail/sendmail.mailhost.cf, as shown in figure 1.
figure 1: /locations/sendmail for the mail servers
Now create a similar directory in the midlevel domains served by this mail host. Again, the directory will be /locations/sendmail and will have the same properties with the same values, with one exception: /etc/sendmail/sendmail.sharedsubsidiary.cf should be the value for the sendmail.cf property.
This configuration assumes that all mail servers will also be gateway servers, capable of forwarding mail to the outside world. We'll look atwhat it takes to have a single gateway server in the section "gatewayservers."
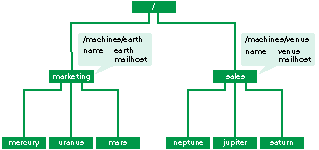
Next use HostManager or NetInfoManager to add the host alias mailhost to the host entry for the mail server. Add this alias in each ofthe midlevel domains this server will serve, as shown in figure 2. If there isn't already a host entry for the mail server in a domain, create anew one, copying the information from the existing entry for this computer in another domain. If you're copying the host entry, be sure to delete the serves property to avoid binding conflicts. Remember, host entries are stored under the /machines NetInfo directory.
figure 2: mailhost aliases for multiple servers
exporting and mounting the spool directories
Normally, mail is stored in the /usr/spool/mail directory. For users tobe able to read their mail from any computer on the network, eachcomputer must have access to all the mail spool directories, one from each mail server. So now you need to make these directories available and make sure that NeXTmail knows where to find each user's mail file.
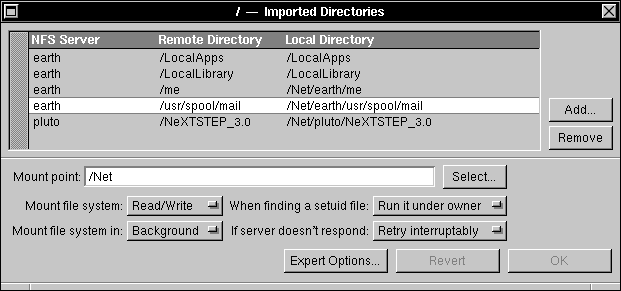
Use NFSManager to export /usr/spool/mail from the mail server. Thedefault options are fine for this purpose. Still in NFSManager, mount the spool directory on all computers by putting the mount information in the root domain, as shown in figure 3. This enables users to receive mail on any computer they use. The mount point should be something other than /usr/spool/mail and can be an automount directory under /Net. For more information, see NeXTSTEP Network and System Administration.
figure 3: mount point for a spool directory
Copy any mail spool files for client users of this server from /usr/spool/mail on the old server to /usr/spool/mail on the new server. If you forget this step, any existing mail waiting to be read will be lost.
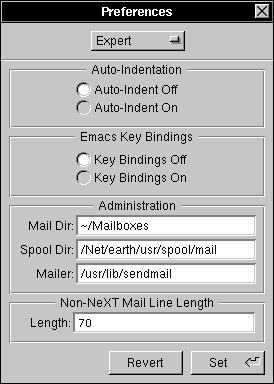
Change NeXTmail preferences for each user whose mail will reside on this mail server. The long way is to start up Mail, choose Preferences from the Info menu, and choose Expert from the pop-up list at the top of the panel. Modify the Spool Dir field to be the full path to the mount point of the mail spool directory, as shown in figure 4. This step must be repeated for each user.
figure 4: NeXTmail preferences
A faster way is to set up a shell script to do this for you:
#! /bin/csh -f
foreach user (cleo jim carlos jeanette)
su -f $user -c "dwrite Mail SpoolDir\
/Net/earth/usr/spool/mail"
end
Replace the user names in the script with real ones, and replace the spool directory name with the full path to the spool directory for these users. Be sure to execute this script as root.
adding mail aliases
Now use the file you created earlier to load the mail aliases into the appropriate NetInfo domain. If you've created a separate domain for the mail servers, log into one of them and enter a command similar to the following:
niload .. aliases < myaliases
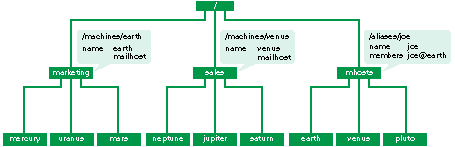
Replace myaliases with the name of the file containing the mail aliases. This will load the mail aliases into the mail server domain, as shown in figure 5. If you don't have a separate mail server domain, load the aliases into the root domain.
figure 5: the mail server domain
testing, testing
At this point you're ready to test one of your new servers. On the mail server, kill the sendmail process and restart it (or reboot the computer), and then run a few tests by sending mail between users served by this mail server. If the mail doesn't arrive or is returned, recheck your work. Double-check the mail aliases and sendmail configuration file information in particular.
repeating-once more, with feeling
You're probably getting a little tired at this point, so take a break. When you get back, repeat these procedures for each of the other mail servers. You've already created the new domain and loaded all the mail aliases, so you can skip those steps.
handling pictures and aliases
Because there isn't a preferences option in NeXTmail to identify the directory containing mail pictures and aliases, each client needs access to that directory as /LocalLibrary/Images/People. Create this directory on the computer you've chosen and export it with NFSManager. Grant root access to at least one of the mail servers so you can update aliases. Use NFSManager to mount the directory on all the computers in the network by putting the information in the root NetInfo domain. The mount point must be /LocalLibrary/Images/People.
considering another option
You might want to mount users' home directories on the mail servers, allowing them to forward their mail with the file .forward in their home directories. If one of the home directory servers is unavailable, however, your mail server might not boot, or could hang waiting for the directory server to respond. Decide whether or not the advantage of .forward is important enough to risk an unavailable mail server, and modify the mount information as needed. For details on .forward, see NeXTSTEP Network and System Administration.
gateway servers
A gateway server handles mail sent to and received from computers not on your local network. If all your mail servers are connected to the outside world, you can have each act as a gateway mail server. The other choice is to have one server act as the gateway and have the other servers pass any nonlocal mail to the gateway for distribution. If you want just one of your mail servers to be the gateway, you need to make some modifications to the sendmail configuration files.
Now for a word of caution-modifying sendmail configuration files is a tricky business. The instructions included in this section are generic, and the configuration at your site may require additional modifications. Before you begin, please carefully read the appendix on sendmail in NeXTSTEP Network and System Administration as well as Eric Allman's "sendmail Installation and Operation Guide," UNIX System Manager's Manual, 4.3 Berkeley Software Distribution, USENIX Association, 1988.
First, we'll look at the modifications necessary on the nongateway mail servers. Using a copy of /etc/sendmail/sendmail.mailhost.cf as the base, create a file with the following modifications:
1. Modify line 33 from this:
DMuucp
to this:
DMether
This change assigns the mailer name ether to the macro M. The net result is that mail addressed to an unknown (nonlocal) address will be handled by the ether mailer rather than the uucp mailer.
1. Change lines 38 and 39 from this:
DR mail-relay
CR mail-relay
to the following, replacing xyz with the host name of the gateway server:
DR xyz
CR xyz
These changes assign the host name of the gateway server to the R macro and the R class. The result: Nonlocal mail will be passed to the gateway server.
3. Comment out lines 236 and 237 so they look like this:
#R$*<@$+>$* $@$1<@$2>$3 already ok
#R$+ $@$1<@$w> tack on our hostname
This change prevents the host name of the nongateway mail server from being added to the sender's return address. Without this change, local mail would show up with the sender's address as user@server rather than just user.
4. Comment out lines 337 and 338 so they look like this:
#R<@$-.uucp>:$+ $#error $:Never heard of UUCP host $1
#R$+<@$-.uucp> $#error $:Never heard of UUCP host $2
This will prevent the nongateway server from returning an error when it doesn't recognize a UUCP partner. Since the gateway servermight be forwarding UUCP mail, you don't want the nongateway servers rejecting messages sent to UUCP partners of the gateway server.
5. Uncomment line 342 and comment out line 344, so they look likethis:
# If you want to pass all other explicit domain names up the ladder
# to our forwarder then uncomment the following line.
R$*<@$*.$+>$* $#$M $@$R $:$1<@$2.$3>$4 user@any.domain
# and comment out this one.
#R$*<@$+.$->$* $#ddn $@ $2.$3 $:$1<@$2.$3>$4 user@any.domain
These changes will pass nonlocal mail to the gateway server. Notice the use of the M macro to identify the mailer to use ($#$M) and the use of the R macro to identify the relay mail host ($@$R). The modifications you made in steps 1 and 2 come into play here.
6. Copy this file into /etc/sendmail on each of the mail servers (other than the gateway), naming it something creative, such as sendmail.nongateway.cf.
7. Modify the local NetInfo domain on each nongateway mail server to access the correct file. Use NetInfoManager to change the value of the property sendmail.cf in the /locations/sendmail directory to be the path to your new file.
8. Kill and restart sendmail on each nongateway server, or reboot the computers.
Now make the modifications needed for the gateway server. Again, begin with a copy of /etc/sendmail/sendmail.mailhost.cf.
1. Comment out lines 236 and 237, as in step 3 of the previous procedure. Again, this will prevent the host name from being added to the sender's address.
2. Read the comment on line 2 of the file and decide whether or not to have the gateway mail server appear with the same name as your domain name. Follow the instructions in the comment if you decide this is what you want.
3. Kill and restart sendmail on the gateway server, or reboot the computer.
4. After testing your new gateway server, you may discover that you need to add the C flag to the definition of the ether mailer on line 234. The C flag appends the domain portion of the sender's address (@host.domain) to the return address so that the recipient can reply to the message.
a little extra maintenance
Using multiple mail servers means a little extra maintenance. As you probably guessed, adding new users takes a couple more steps. When you add a new user, you must make sure to create a mail alias for that user so mail will be directed to the correct mail server. You also need to make sure that NeXTmail accesses the correct mail spool directory by modifying the Spool Dir preference for the new user.
Updating aliases for NeXTmail requires some extra thought as well. Normally, you use the command mailDBupdate to update pictures and aliases for NeXTmail. This command dumps user account and alias information from the root NetInfo domain and places the results in aliases and passwd in /LocalLibrary/Images/People. If your setup stores aliases in the root domain, rather than in a midlevel domain, mailDBupdate will still work. However, if you've set up a separate domain for your mail servers, you'll need to update aliases yourself. Here's a script that will do the trick:
#! /bin/csh -f
mailDBupdate
nidump passwd /domain > \
/LocalLibrary/Images/People/passwd
nidump aliases /domain \
/LocalLibrary/Images/People/aliases
Replace both instances of domain with the name of the domain storing your aliases. Be sure to run this script as root from a computer that has root access to /LocalLibrary/Images/People and consider running it every night using cron. By the way, the script includes mailDBupdate to handle any new mail pictures.
Unfortunately, there's a problem when using nidump to extract mail aliases this way. NeXTmail expects each alias definition in /LocalLibrary/Images/People/aliases to be on a single line, regardless of its length. If an alias contains enough members, nidump will split the definition into multiple lines. To avoid this problem, make sure none of your aliases have a lot of members, or consider practicing your awk or sed skills to create a script that will properly format the output of nidump.
Regardless of where you store your aliases, including aliases in the form user@server in NeXTmail addresses has some unexpected results. Let's say you have a user with the login name jnewberg. Your aliases include the following:
| alias names | members | |
| jnewberg | jnewberg@earth | |
| Julia_Newberg | jnewberg | |
| julia_newberg |
After you've updated aliases, the Addresses panel in NeXTmail will show jnewberg under Login Names, Julia_Newberg under Users, and jnewberg under Groups. This doesn't hurt anything (mail will still be delivered correctly), but it might be confusing for your users. To prevent this, when updating you need to strip out the aliases that include @server_name. Here's a modified script that will do that for you:
#! /bin/csh -f
mailDBupdate
nidump passwd /domain > \
/LocalLibrary/Images/People/passwd
nidump aliases /domain | grep -v "@server1" | \
grep -v "@server2" > \
/LocalLibrary/Images/People/aliases
Again, replace domain with the appropriate domain name. Also replace server1 and server2 with the host names of your mail servers. If you have more than two servers, include additional instances of the grep -v command in the pipe.
If some of your users run regular UNIX mail from time to time, perhaps because they log in remotely over a modem, you'll need to tell them about the spool directories. Because mail is no longer kept in /usr/spool/mail, users will have to use mail -f to read mail from the appropriate spool directory-or log into the appropriate mail server, but you probably don't want them to do that. Another possibility is to put a mount entry for /usr/spool/mail from the mail server into the midlevel domains served by that computer. By mounting this directory on /usr/spool/mail only on each of this server's clients, users won't have to use the -f option unless they're remotely logged into a computer served by a different mail server.
now for the payoff
Sounds like a lot of work, doesn't it? If you plan thoroughly, allow for a few mistakes along the way, and time your work carefully, you'll no doubt succeed. Once you've finished, your network, or at least your users, will thank you profusely.