
printing with PostScript devices
feature by Andrew Simms with special thanks to Amir Gharaat
You awaken in a dark room. There are boxes, manuals, and cables strewn about. There is a printer with a screwdriver driven into the heart of the printing mechanism. The police are breaking through the door. You realize that this is your office and you must have passed out. There is a loud crash as the printer leaps on your face ....
Printer configuration doesn't have to be a nightmare. This article serves as a guide to existing methods of attaching a PostScript® output device to your network and configuring your NeXTTM computers to use it. If you're only attaching NeXT printers, you don't need to read this article. Information on installing NeXT printers is covered in the NeXT User's Reference and Network and System Administration manuals. If you have successfully attached a PostScript output device to a NeXT computer and would like to see the process outlined in a future edition of the support bulletin, please see the submission guidelines at the end of the article.
connections for output devices
There are two primary means of attaching an output device to a NeXT computer: direct attachment (for example, via a serial cable) and network connection (for example, via EtherTalk®). Direct attachment is typically simple, inexpensive, and slow, and the physical distance between the NeXT computer and the output device is limited by the length of the cable. Network connection is generally complex, fast, and expensive, and there are few distance limitations. The path you choose must be determined by your budget, your output device, your users, and of course, your patience.
Table 1 illustrates the relative speeds for each type of connection. The times listed reflect the approximate numbers of seconds for a test file of 48,177 bytes (a typical number for a page of text) to be transmitted to an output device, assuming an ideal connection and no buffer overruns.
table 1: transmission times by connection type
| connection | speed | |
| 9600 baud serial cable | 46 seconds | |
| 38400 baud serial cable | 10 seconds | |
| LocalTalk® network | 6 seconds | |
| Ethernet | < 2 seconds |
These figures should be used only for comparing relative speeds of each connection type. There are many other factors that influence the time it takes to actually print a page, such as printer processor speed.
configuration fundamentals
All remote printing and printing to non-NeXT local printers on NeXT computers is accomplished through the Berkeley spooling system, more commonly referred to as lpd spooling. The name lpd comes from the Line Printer Daemon program, which accepts print requests and dispatches them to the appropriate printer. The lpd program accepts print requests in a special format, which is typically generated by the lpr program. The lpd system relies on a database of printers called the printcap printer capability database. All PostScript output devices must be described in printcap before they can be recognized and used by application programs. On the NeXT computer, this information is stored in NetInfoTM.
Information about a single printer in the printcap database is typically called a printcap entry. A given entry contains various pieces of information about a printer but will always contain these three items:
|
Name (and possibly aliases) of the printer |
|
Location of the printer |
|
Location of the spool directory |
The name of the printer, as listed in printcap, is how it will be referred to in the Print panel of applications. The location of the printer determines if it is locally or remotely attached. The spool directory indicates where print jobs are stored after a print request is issued but before the output appears at the device.
Each printer you want to use must have a printcap entry in order to be recognized by applications. Printer names must be unique.
network connection strategies
You must address several issues before you begin configuration, such as which printers will be made available to the network and which NeXT machines will access the printers. You should work out these administrative issues in advance and write them down.
At this time, NeXT supports only one network connection paradigm-a printer attached to a remote UNIX® host. With the purchase of additional hardware, you can expand this model to include printing to different types of networks, such as EtherTalk. The Cayman Systems GatorBox® is one such device, and, as of this printing, the only "one-stop" solution.
Before performing any of the procedures explained in the following sections, please read all the instructions in the appropriate section. Unless otherwise specified, perform all commands as root.
setting up for general remote printing
The instructions in this section apply when the remote print server is a non-NeXT computer that runs a Berkeley-compatible remote spooling system (exporting a printer from a NeXT host is described in the Network and System Administration manual). You'll also need to be running Release 2.1 or have the 2.0 lpr patch installed. You may need to consult the manuals for the print server's spooling system. NeXT strongly recommends that you coordinate with the system administrator of the print server before configuring your machine to use the remote printer.
1. Determine the host name of the remote host.
2. Test connectivity to the remote host using ping. The following simple test verifies that the host name is valid and is reachable. For more information, see the UNIX manual page for ping(8). Enter
 ping -v remotehost 64 1
and you should get a response like
PING remotehost: 64 data bytes
72 bytes from 111.18.10.220: icmp_seq=0. time=30. ms
----remotehost PING Statistics----
1 packets transmitted, 1 packets received, 0% packet loss
round-trip (ms) min/avg/max = 30/30/30
3. Determine the local name of the remote printer. You may have to ask the system administrator of the remote machine.
4. Set appropriate permissions. This usually involves placing the host name of your NeXT computer in the /etc/hosts.lpd flat file of the remote machine.
5. Build a remote printcap entry in a temporary file on your NeXT computer. You can use the following (or the example at the end of the /etc/printcap flat file) for a model:
netnp:\
:lp=:rm=remotehost:rp=remotename:\
:sd=/usr/spool/netnp:\
:ty=some printer:
You'll need to replace remotehost with the name of the remote machine and remotename with the remote machine's local printer name. The string following ty= is a free-format description that will appear in Print panels.
6. Load the printcap entry into the appropriate NetInfo domain. The following example shows the entry being loaded in the local domain. Replace filename with the name of the printcap file created in the previous step:
niload printcap . < filename
On a multilevel network, you need to evaluate what machines should see the printer and choose a domain appropriately.
7. Enter
nidump printcap .
The system will display output like that shown below. Check it to verify that the entry was loaded correctly.
Local_Printer: \
:if=/usr/lib/NextPrinter/npcomm:\
:gf=/usr/lib/NextPrinter/psgf:\
:nf=/usr/lib/NextPrinter/psnf:\
:tf=/usr/lib/NextPrinter/pstf:\
:rf=/usr/lib/NextPrinter/psrf:\
:vf=/usr/lib/NextPrinter/psvf:\
:cf=/usr/lib/NextPrinter/pscf:\
:df=/usr/lib/NextPrinter/psdf:\
:note=:\
:ty=NeXT 400 dpi Laser Printer:\
:lp=/dev/null:\
:sd=/usr/spool/NeXT/Local_Printer:\
:_ignore:
netnp: \
:lp=:rm=remotehost:rp=remotename:\
:sd=/usr/spool/netnp: \
:ty=some printer:
Note that you will always have a printcap entry in the local domain for a printer called Local_Printer. If there is no local printer configured, the _ignore property will be present, and the entry will be ignored (as in this example).
8. Create a spool directory, as specified with the sd= parameter:
cd /usr/spool
mkdir netnp
chmod 770 netnp
chown agent.daemon netnp
You will need one spool directory for each printer you add.
9. Restart your NeXT computer. This is necessary only to create lpd print daemons for the printer. You can also use the lpc program to accomplish this.
setting up for remote printing with a GatorBox
A GatorBox acts as a gateway between TCP/IP and LocalTalk®/EtherTalk. The software that runs on the GatorBox makes it appear to be another UNIX host on the network, which runs the lpd spooling system. This "deception" makes it possible for the NeXT computer to send print jobs to the GatorBox. The GatorBox in turn converts these print requests into LocalTalk or AppleTalk® print requests and passes them along to the appropriate printer.
Configuring a NeXT machine to work with a GatorBox is mainly a task of assigning names. The basic procedure is an extension of configuring a remote printer entry. The added twist is the configuration of the GatorBox. You'll use a utility called GatorKeeperTM to accomplish this. This utility is documented in the GatorShareTM User's Guide, which you should be familiar with before setting up anything.
Before starting, review the general summary and the following specific example. The summary includes steps you should take prior to configuring your system to use a GatorBox.
general summary
1. Install your network. Set up LocalTalk or EtherTalk and verify that it works before attaching the GatorBox. If you're also configuring a NeXT network, finish installing it before your proceed. Since GatorBoxes don't run NetInfo, you'll want to specify that the host doesn't run NetInfo by not checking the "This is host's parent netinfo domain" check box in NetManager.
2. Determine a unique IP address for the GatorBox. If you're on a campus or company network, obtain the appropriate addresses from the network administrator.
3. Follow the instructions in the GatorShare User's Guide for configuring and loading the GatorBox. When you specify printers, be sure to note their names-you'll need them later.
4. Place a host entry for the GatorBox in the appropriate NetInfo domain-this is typically the root-level domain for a network of NeXT computers or the local domain for a standalone system. If your network uses NIS (formerly Yellow Pages) or BIND (Berkeley Internet Name Domain) as the primary name resolution system, place the host name and IP address there.
5. Prepare a printcap entry to be loaded into NetInfo. Use the netlw sample entry in the /etc/printcap file as a guide (see the next section for details).
6. Load this entry into the appropriate domain in NetInfo-this time the entry must go into NetInfo. The appropriate domain should be the one that encompasses all machines authorized to use the printer. If you wish all machines to have access, place the entry in the root domain.
7. Create any spool directories and set ownerships.
8. Run GatorKeeper and configure the printers for the GatorBox.
9. Restart your NeXT computer.
At this point, you should be ready to print. Try a small print job first. You may wish to monitor activity on the GatorBox by using GatorKeeper.
a specific example
This example shows how to configure a single NeXT machine to print to two devices on a LocalTalk network (see figure 1). In the example network, the machine called myhost is configured for a non-NetInfo network. Even NeXT machines on non-NetInfo networks use NetInfo to resolve information about their local domain. Thus, unlike other UNIX machines (on which you would use the /etc/printcap file to describe attached printers), you must instead place this information in the NetInfo database.
figure 1: configuration for the example
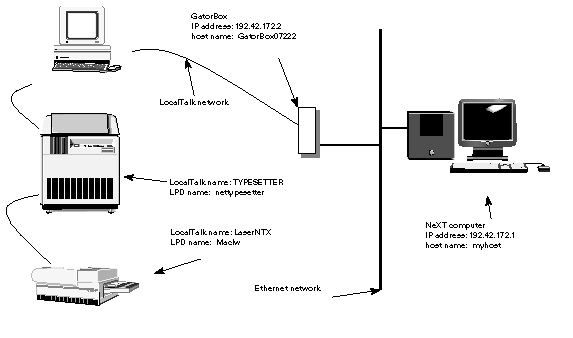
Here's what to do. Do these operations as root:
1. Create a host entry for the GatorBox using NetManager. Since there's only one NeXT machine on the network, place the host entry in the local NetInfo domain.
2. Place the following entries in a file in /tmp. You can save typing the entries by copying the last entry in the flat file /etc/printcap:
NetLaserWriter|netlw:\
:lp=:rm=GatorBox07222\
:rp=Maclw:\
:sd=/usr/spool/lpd.lw:\
:ty=LaserWriter:
NetTypeSetter|nettype:\
:lp=:rm=GatorBox07222:\
:rp=Mactypesetter:\
:sd=/usr/spool/lpd.typesetter:\
:ty=PhotoTypesetter:
ty=printer type specifies the printer type. This string will appear in printing dialog boxes and is free format. If you want to have users see additional information about the printer, you can add a note= field. The text in this field will appear in print dialog boxes when the printer is selected.
3. Load the file into NetInfo:
niload printcap . </tmp/pc
4. Verify that the entry was loaded by entering
nidump printcap .
and checking the output.
This command lists all the printers in your local domain.
5. Establish spool directories that you specified with sd=options:
cd /usr/spool
mkdir lpd.lw
mkdir lpd.typesetter
chmod 770 lpd.lw
chmod 770 lpd.typesetter
chown agent.daemon lpd.lw lpd.typesetter
If there were more computers on the network that needed to use the output devices, you would do this for each computer.
This completes the installation on a NeXT computer. If you haven't done so already, run GatorKeeper and configure the two printers on the GatorBox. Use exactly the same name as the one you specified in the printcap rp=field. Once the GatorBox is configured, you should be able to use the printers immediately from any NeXT application or from the shell.
troubleshooting hints
Once the GatorBox is running, you can obtain a lot of useful information with the following commands:
| ping | GatorBoxes can respond to ping, often with error codes. |
| telnet | GatorBoxes provide limited remote control via telnet. You can type "help" for a list of commands. |
| lpc and lpq | BSD spool commands work with the GatorBox. |
setting up a serial connection
NeXT serial ports provide the simplest, cheapest-and slowest-connection to any output devices that support them. NeXT computers are equipped with two serial ports that support a variety of baud rates. On 040-based systems, these ports are RS-423. On 030-based systems, these ports are RS-422. Both types can be made RS-232-compatible by using the correct cables. Information on the serial port hardware appears in the zs(4) manual page. For correct information on the pinouts of NeXT computer serial ports, please see the on-line zs(4) manual page. The NeXT Network and System Administration manual was printed with the wrong revision of the zs(4) manual page.
baud rates and flow control
There are two critical configuration issues when using a serial connection: baud rate and flow control. Both the NeXT machine and the output device must use the same baud rate and flow control mechanism or printing will not work. The serial ports on NeXT computers can communicate at a variety of baud rates, with a maximum rate of 38400 baud. Information on baud rates is in the tty(4) manual page.
Computers can usually send data faster than output devices can process it. A protocol for communication, typically called flow control, prevents data losses caused by buffer overflows. The two most common types of flow control are hardware flow control and software flow control. NeXT 68040- and 68030-based computers support a type of software flow control called XON/XOFF. NeXT 68040 computers also support RTS/CTS hardware flow control. Most serial output devices support software flow control, many support both hardware and software flow control, and a few support only hardware flow control. Your device's manual should tell you what type of flow control your printer supports and how to enable it. You won't be successful printing PostScript documents from a NeXT computer unless you correctly configure the flow control. Table 2 shows the baud rates and flow control modes for some popular output devices.
table 2: serial output device settings
| output device | maximum baud rate | flow control | |
| Apple LaserWriter® Plus | 9600 | XON/XOFF | |
| Apple LaserWriter IINT | 38400 | XON/XOFF | |
| QMS ColorScriptTM 100--Model 10 | 9600 | XON/XOFF | |
| Océ Graphics 5232 | 19200 | DTR | |
| Linotronic® PostScript RIP 2 | 19200 | XON/XOFF | |
| Agfa Compugraphic 9000PS® | 38400 | XON/XOFF | |
| Agfa ChromaScriptTM | 38400 | XON/XOFF |
the right cable
It's absolutely essential that you get the right cable for your printer and your NeXT computer. Macintosh® serial cables usually do not work with 68030-based NeXT computers and definitely do not work with 68040-based NeXT computers. In addition, cables for 68030 NeXT computers are not compatible with 68040 serial cables.
Certain output devices (for example, the Océ 5232) only support hardware flow control. However, none of the printers tested for this article that support hardware flow control use the RTS/CTS method NeXT 68040-based computers use. Most use a PC standard called DTR (data terminal ready) flow control instead. This means that instead of dropping the CTS (clear to send) signal when they want the controlling computer to stop sending data, they drop another RS-232 signal called DTR. This will not work with a standard 68040 null-modem cable. You'll need a custom cable that interchanges the DTR and CTS signals to get around this problem. At the RS-232 end of the cable, pins 5 and 20 must be swapped (as indicated below).
| Mini-Din end | RS-232 end | swapped pins |
| 1 | (DTR) | 8 | (DCD) |
| 2 | (DCD) | 20 | (DTR) | 5 | (CTS) | |
| 3 | (TXD) | 3 | (RXD) | |||
| 4 | (GND) | 7 | (GND) | |||
| 5 | (RXD) | 2 | (TXD) | |||
| 6 | (RTS) | 5 | (CTS) | 20 | (DTR) | |
| 8 | (CTS) | 4 | (RTS) |
configuring an output device with PrintManager
Before proceeding, you should connect the device to the NeXT computer and turn on both machines. Then configure the device using PrintManager. If your device isn't listed, choose Unknown LaserWriter. Now you are ready to set the baud rate and flow control.
setting baud rate and flow control on the output device
Some PostScript output devices have switches or buttons that allow you to set the baud rate and flow control. In these cases, refer to the device's documentation for specific instructions. Most devices require that these settings be changed through the PostScript interpreter itself. To do so, you need to send the following PostScript code to the device:
%!
serverdict begin 0 exitserver
statusdict begin
device rate flow setsccbatch
end
You can enter this code using the Edit application.
The fourth line of the above code must be adjusted to the desired device number, baud rate, and flow control.
|
Replace device with the device number. Although the serial device number of most PostScript devices is 25, some use the number 1. You can find this number in the device's documentation. |
|
Replace rate with the desired baud rate. Refer to the device's documentation for the fastest supported baud rate. If the device supports baud rates of faster than 38400, don't use them. NeXT serial ports can't transfer data faster than 38400 baud. |
|
Replace flow with the number for the desired mode of flow control. In most cases, 0 will set XON/XOFF flow control, and 4 will set flow control to DTR. Refer to the device's documentation to find this number. |
Save the file with a .ps extension. For this example, we will use the file name setbaud.ps. Once you've saved this file, send it to the output device. Make sure the device is connected and switched on, then start up the Terminal application and enter the following command:
% lpr -P printername setbaud.ps
Replace printername with the name you used for the device in PrintManager. This will not cause an actual page to be printed but merely sets the baud rate and flow control of the output device. These changes may not be saved if the printer is turned off (see your device's manual for details). Now follow the instructions in the next section to set the same baud rate and flow control on your NeXT computer.
setting baud rate and flow control on your NeXT computer
Now you must make sure that the settings for your NeXT computer's serial port match those for the output device. The easiest way to accomplish this is to use the NetInfoManager application.
1. Start NetInfoManager.
2. Click the printers option in the first column.
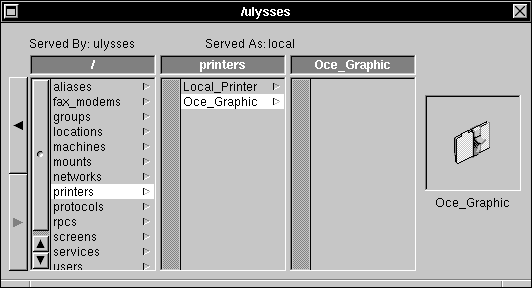
3. Double-click the device name in the center column to open a window in which you can edit the printcap information for that device. (The Network and System Administration manual incorrectly states that you must use niload to enter printcap information.)
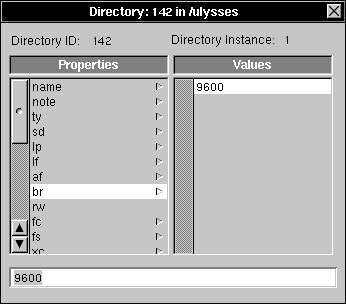
4. Click br in the left column of the new window. The printcap entry's current baud rate will be displayed in the right column. If you want to change this setting, click the number, enter the new baud rate in the text field at the bottom of the window, and press Return.
5. Click lp in the left column. If the entry in the right column is ttya, XON/XOFF flow control will be used. If you need to change flow control to DTR, change this entry to ttyfa.
6. Save the new settings. If you aren't logged in as root, a window will appear in which you must enter the root password before you can save any changes.
Now the computer's serial port settings should correspond to those of the output device. From this point on, you can print any document through the standard Print panel by selecting the name of the output device.
submission guidelines
If you have successfully attached a PostScript output device to a NeXT computer and would like to have the process explained in a future issue of the support bulletin, please send the information requested on the following page to
Managing Editor, support bulletin
NeXTedge
NeXT Computer, Inc.
900 Chesapeake Drive
Redwood City, CA 94063
|
What printcap entry did you use? |
serial installation
|
What cable did you use (pinout and source)? |
|
Did you have to change the default baud rate for the printer? If so, how? |
network installation
|
Did you use a GatorBox? If not, what gateway or software did you use? |
|
Please describe any problems that you had during your installation. |
references
GatorAid Technical Support Handbook. Cayman Systems, Inc., 1990.
GatorShare User's Guide. Cayman Systems, Inc., 1990.
Network and System Administration. NeXT Computer, Inc., 1990.
UNIX manual pages for lpd(8), lpc(8), lpr(1), lprm(1), ping(8), tty(4), and zs(4).